
How to connect Digibee to MongoDB Atlas using VPN
Learn how to securely connect the Digibee Integration Platform to MongoDB Atlas using a VPN.
To establish a connection between the Digibee Integration Platform and MongoDB Atlas using a Virtual Private Network (VPN), you need to contact Digibee Customer Support and provide the following MongoDB Atlas details:
The cluster hostname
The three hosts used for load balancing by the main host
Once the VPN setup is complete, you can integrate MongoDB Atlas with Digibee using the MongoDB connector.
Connecting Digibee to MongoDB Atlas
Steps 1 and 2 should be performed within the MongoDB Atlas platform. Please note that the interface may change over time. If you are unable to follow these steps, please contact our Support team and we will update the documentation accordingly.
Obtain the cluster hostname
The cluster hostname is automatically generated by MongoDB Atlas and is included in the connection string provided by MongoDB.
For example, in the connection string mongodb+srv://cluster0.71llx.mongodb.net, the cluster hostname is cluster0.71llx.mongodb.net.
Follow these steps to find the cluster hostname in Mongo Atlas:
In the MongoDB Atlas platform, go to the Deployment section and click Database.
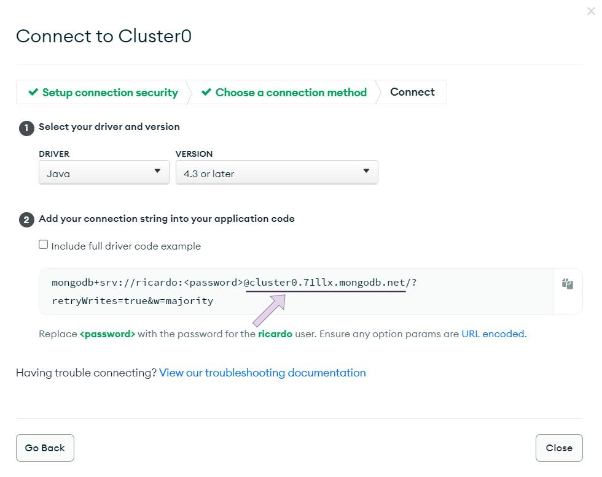
On the next page, click Connect.
Under Setup connection security, select Connect your application.
The following page displays the full connection string. The cluster hostname is part of this string and follows a structure like
@cluster0.71llx.mongodb.net.Copy the hostname and save it for later use.
Obtain the three hosts
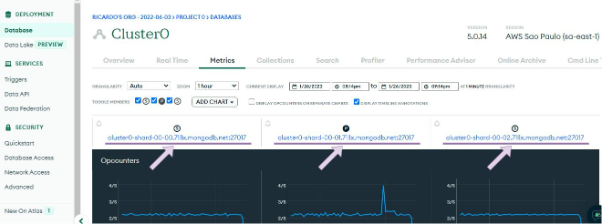
In addition to the cluster hostname, you need to retrieve the three hosts used for load balancing by the main host.
For example, if the main host is cluster0.71llx.mongodb.net, the load-balancing hosts are:
cluster0-shard-00-00.71llx.mongodb.net:27017cluster0-shard-00-01.71llx.mongodb.net:27017cluster0-shard-00-02.71llx.mongodb.net:27017
Follow the steps below to find the three hosts:
In MongoDB Atlas, go to the Deployment section and click Database.
On the next page, click View Monitoring.
Open the Metrics tab.
Locate and copy the three hosts listed, then save them for later use.
Provide the collected information to the Support team
After gathering all the required details, contact the Digibee Customer Support and share the following:
The cluster hostname
The three hosts used for load balancing
Once this information is provided, the Digibee Support team will configure your realm to enable the pipeline to connect to MongoDB Atlas via a VPN connection.
Using MongoDB Atlas on Digibee
Authenticating Mongo Atlas
To authenticate MongoDB Atlas on Digibee, you need to provide the connection string. By default, MongoDB Atlas includes the username and password in the connection string, but we recommend removing these credentials and storing them in an Account on Digibee for enhanced security.
Saving credentials as an Account on Digibee
Follow these steps to securely store your MongoDB Atlas credentials:
On the Digibee Integration Platform home page, click Settings in the upper-right corner.
Navigate to the Accounts page.
Create a new Account and configure the following details:
Account name: Choose a name, such as
account-mongoatlas.Account type: Select Basic.
Username and Password: Enter the credentials from the Database Access page in MongoDB Atlas.
By storing credentials this way, you establish a secure connection between the Digibee Integration Platform and MongoDB Atlas via VPN, enabling your pipelines to access the database safely.
Connecting the pipeline to the database
After the VPN configuration is complete, you can connect your pipeline to the database using the MongoDB connector.
Required information:
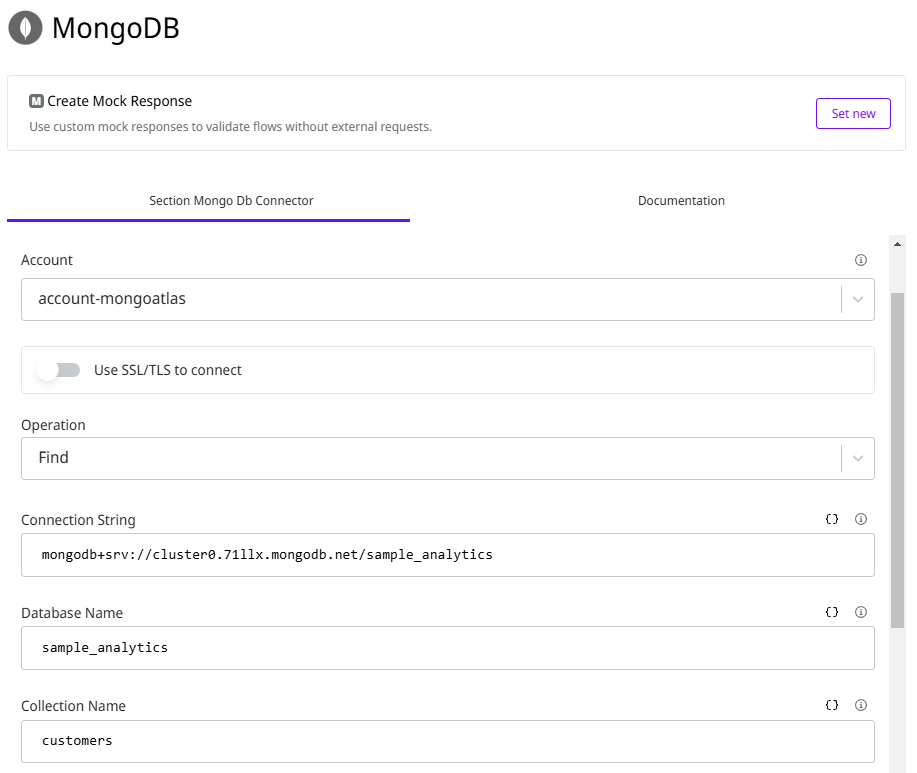
The Account configured with the Username and Password.
The Connection String (without credentials), for example:
mongodb+srv://cluster0.71llx.mongodb.net/<nomedobanco>The Database Name and the Collection Name, which can be found in the Collection tab on Data Services on Mongo Atlas.
Here’s an example of the MongoDB connector configuration:
Last updated
Was this helpful?